Client setup
MechworksPDM requires that the current user has ADMIN rights, both in a network environment or in an off-network installation.
More, it's mandatory to run the installer as admin, despite of the fact the current user is already an admin type account.

This because by default the Administrator account is disabled in Windows7 and Windows8 and run as administrator is the only way to have granted necessary admin rights.
Uninstall first or update?
When installing a minor version (e.g. R23sp1 → R23sp2), you can doubleclick the installer so to update the current installation.
When updating from a major version to another (e.g. R20 → R23), uninstall first (control panel) and then execute (as admin) the installer.
The R23 installer
The client installer is named MechWorks_Pdm_Msi_R23_SP<sp>.EXE
Once started it shows different dialog as described here:
Welcome → Language selection → EULA → Installation type → GPP location → Fetaures selection → Recap → ODBC → Finish
The R24 and R25 installation
Since R24 and R25 are provided as a service, there's no installer available on the website for the customers. Please contact a reseller in order to receive an installation/customization process.
R26 installer
The MWPDM Service installer has been fully redesigned with modern, robust, and future-proof architecture. It is now completely independent from legacy technologies, such as VBScript, and does not rely on any external scripting mechanisms like PowerShell. This design choice ensures that the installation can be performed reliably even on systems where VBScript and/or PowerShell are disabled, restricted by security policies, or no longer available. As a result, the installer is fully compatible with modern, hardened, and enterprise-managed environments. In addition to removing these dependencies, the internal structure and execution flow of the installer have been entirely reworked. This redesign improves clarity, reliability, and maintainability, while significantly reducing unnecessary steps during setup. From the user’s perspective, these changes translate into a simpler, faster, and more intuitive installation experience, with fewer prompts and a more streamlined process. Overall installation time has been reduced, and the setup process is now more consistent across different system configurations. For diagnostic purposes, installation logs can be collected using the CaptureMechWorksPdmLog tool (available from the Windows Start menu), which collects all PDM logs. These logs should then be sent to MechWorks for analysis.
Solidworks Document Manager distribution/deployment
Due to the transition to service architecture, the PDM installer no longer handles the installation and distribution of the Solidworks Document Manager.
Users working with Solidworks documents in MechworksPDM Standalone mode have control over the Solidworks Document Manager installation and configuration.
•The PDM installer will no longer automatically install Solidworks Document Manager components
•Users requiring Solidworks document handling in Standalone mode must manually register the required DLL library
•The PDM installer will display a warning notification when Solidworks is not detected on the machine or when the Document Manager is not properly installed/registered
Users working with Solidworks documents in PDM Standalone mode can ensure a proper library registration through the admin DOS prompt command:
regsvr32 "C:\Program Files\Common Files\SOLIDWORKS Shared\swdocumentmgr.dll"
Installation type: Individual, Local or Client & Server?
Once run the installer, you'll be asked to choose the installation type:
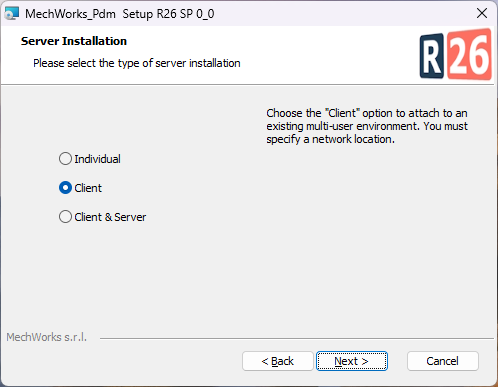
Individual
It's a local installation on one workstation, usually for testing purpose.
In case you can join an already existing environment (network installation) by manually change some registry entries.
Client
It's the most common type of installation; it requires that a server has already been installed with a shared folder (the Global Parameters Path).
Client & Server
It's the first step when you need to setup a network environment and no other workstation has been installed yet.
When you install a shared solution you are required to select
•The drive that points to the server
•The exact path on the server
•The local installations path for dlls and local settings
Mind that in a Server + Client installation all the clients must have the same drive mapping as far as the MechworksPDM server is concerned.
E.g. if on the first client the server is set to O:\Mechworks_PDM_Server, then on all the clients the drive O:\ must point to the same UNC path as on the first client: drive mappings need to be consistent across the network.
After installing the first client, make sure that the drive mappings are consistent, then select the installation type Client, indicating the Server path as on the first client.
Selecting Features
The installer is able to detect which CAD application is installed on the workstation so to suggest the addin to install.
More, you can choose to enable Standalone and/or Admin tools:
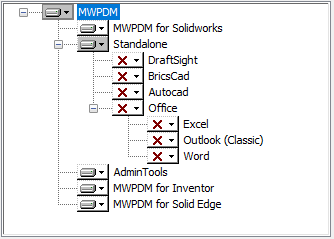
AdminTools should be installed on administrative workstations. The tools allow to modify the database structure and add/remove fields, which could lead to loss of data or inconsistencies.
Please note starting from sp1.0 the installation of the Office integration components has been split to let the user choosing which features to install.
For example, if you need to install the MWPDM Service integration for Word only (and not for Excel or classic desktop Outlook) you can simply select the Word feature.
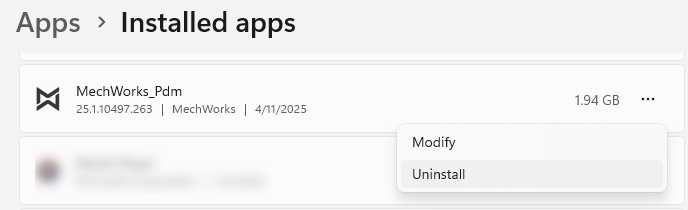
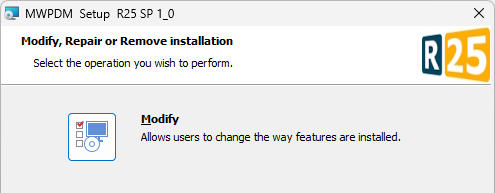
I you want to change a feature later, after the installation is completed, you can do it in 2 ways:
•from Windows Control Panel → Programs and Features:
•running the same installer and choosing Modify:
x64 ODBC installation
Starting from R20sp1, the MechworksPDM installer detects the MDB x64 driver on the workstation: if missing, it installs such driver by downloading from Microsoft website.
If MSOffice x86 is already installed on the workstation, no x64 MDB driver will be installed during the setup procedure.
See here for further details.
Activating the product
Activate the addin for Solidworks
1.Run SolidWorks then click Tools, Add-Ins .... 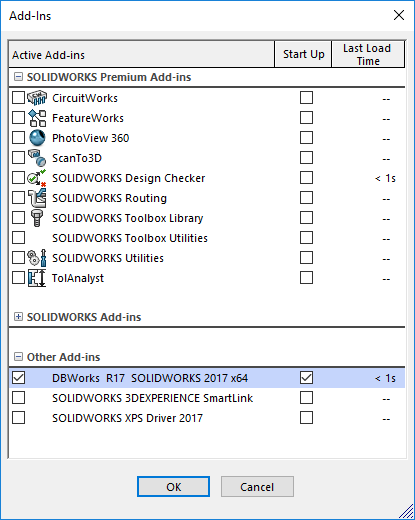
Enable the checkboxes to activate DBWorks
2.The following menu entry appears under the Tools menu: 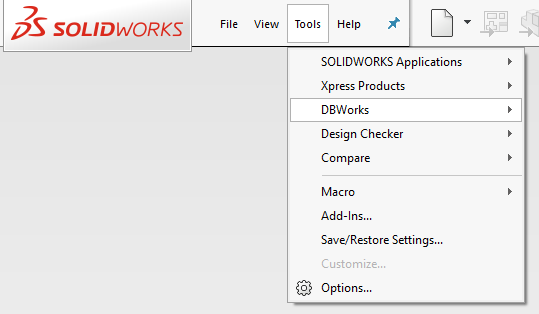
3.optionally you can choose to show the DBWorks toolbar: 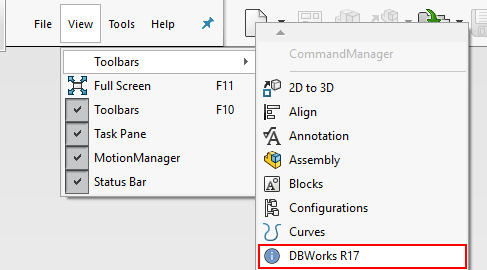
4.You are now ready to start working with DBWorks
Activate the addin for Inventor
1.Run Inventor then click Tools, Add-Ins: 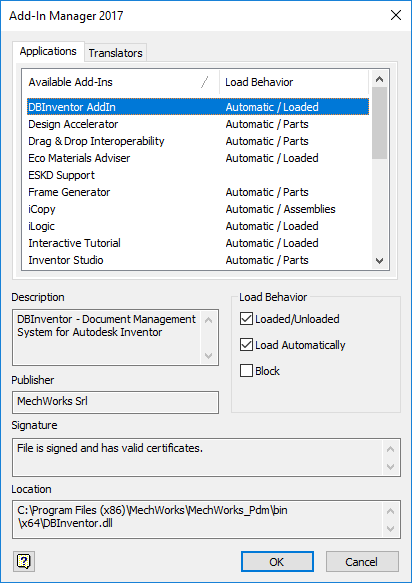
2.make sure the DBInventor AddIn is UnBlocked and loaded.
Activate the addin for Solid Edge
1.Run Solid Edge, click Settings, Add-Ins: 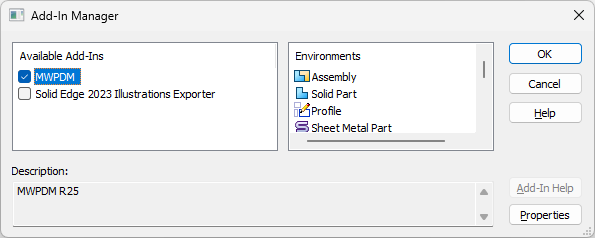
2.check the entry to enable the addin.
Passing manually to a network environment with shared resources
1.Install MechworksPDM locally (Individual type, GPP in C:\Mechworks_PDM_Server\) on the workstation as if in an out-of-network environment
2.Change the following registry entries with the remote GPP (GlobalParametersPath) location:
•HKEY_LOCAL_MACHINE\SOFTWARE\MechWorks\DBWorks Standalone\98
•HKEY_LOCAL_MACHINE\SOFTWARE\MechWorks\DBWorks\98
•HKEY_LOCAL_MACHINE\SOFTWARE\MechWorks\DBSolidEdge\98
•HKEY_LOCAL_MACHINE\SOFTWARE\MechWorks\DBInventor\98
•HKEY_LOCAL_MACHINE\SOFTWARE\WOW6432Node\MechWorks\DBWorks Standalone\98
•HKEY_LOCAL_MACHINE\SOFTWARE\WOW6432Node\MechWorks\DBWorks\98
•HKEY_LOCAL_MACHINE\SOFTWARE\WOW6432Node\MechWorks\DBSolidEdge\98
•HKEY_LOCAL_MACHINE\SOFTWARE\WOW6432Node\MechWorks\DBInventor\98
•HKEY_LOCAL_MACHINE\SOFTWARE\WOW6432Node\MechWorks\DBInventor\98
SQLServer database
Standard Client or Native Client?
According with Microsoft specifics, Native Client has more optimizations for applications taking advantages from Transaction-SQL (SQLServer native language).
DBWorks is based on an ODBC datasource (that works with a standard subset of T-SQL) so it does not take advantage of such feature.
For this reason we suggest the Standard Client rather than the Native Client.